


The following is a guest post by Cliff Cawley, creator of Lost Relics.
It’s been eight months since I released the first playable version of Lost Relics (formerly "Forgotten Artifacts"), a hack-and-slash dungeon crawler which runs on Ethereum Mainnet via the Enjin Platform.
Lost Relics was the first project accepted into the Enjin Spark program. After missing out on the initial early adopter program due to being busy with other work, I jumped at the chance to join Spark and the Enjin ecosystem—and embark on my adventure in the blockchain gaming space.
Here's my experience since then, along with best practices and recommendations for on making the most of Enjin's blockchain game development platform.
The first game release in May 2019 was quickly followed by "Stampede," an event I used to see how well the systems I’d built performed under stress, and if there was anything further I needed to build and maintain.
I had originally planned to shut the server down after the Stampede event in order to spend some time reorganizing, planning, and improving. However, participants enjoyed it so much, they asked me to keep the server running and allow them to continue playing.
With only minimal downtime for updates, the game has been live for eight months and counting!
The second event, "The Fallen Tablets," began July 1 and tested passing blockchain assets between players to complete a goal.
As a reward, players were given the chance to find high-tier loot within a secret treasure room after activating and passing along one of the three tablets.
I launched using PlayFab for my backend services, which allowed me to rapidly deploy crucial systems such as player accounts, inventory management, and server-side scripting.
PlayFab is an amazing, simple, and easy-to-use service if you’re just starting out. They handle a lot of systems for you and have some fantastic features, such as player management, player inventories, item database, analytics dashboards, and leaderboards.
I highly recommend PlayFab, but your mileage may vary depending on what you’re attempting to achieve.
I ran into issues with the way I needed things to work, some of which I detail below. In the months since I first used PlayFab, they’ve done some significant upgrades and changes, so some of the issues I ran into may have been addressed by now.
I publicly announced Enjin integration with a full user path from login to obtaining an item on March 29.
While it’s incredibly quick to show that you can do this process using Enjin’s Blockchain SDK for Unity, you won’t want to release your game by using the SDK to do write operations (e.g., creating, sending, and minting items).
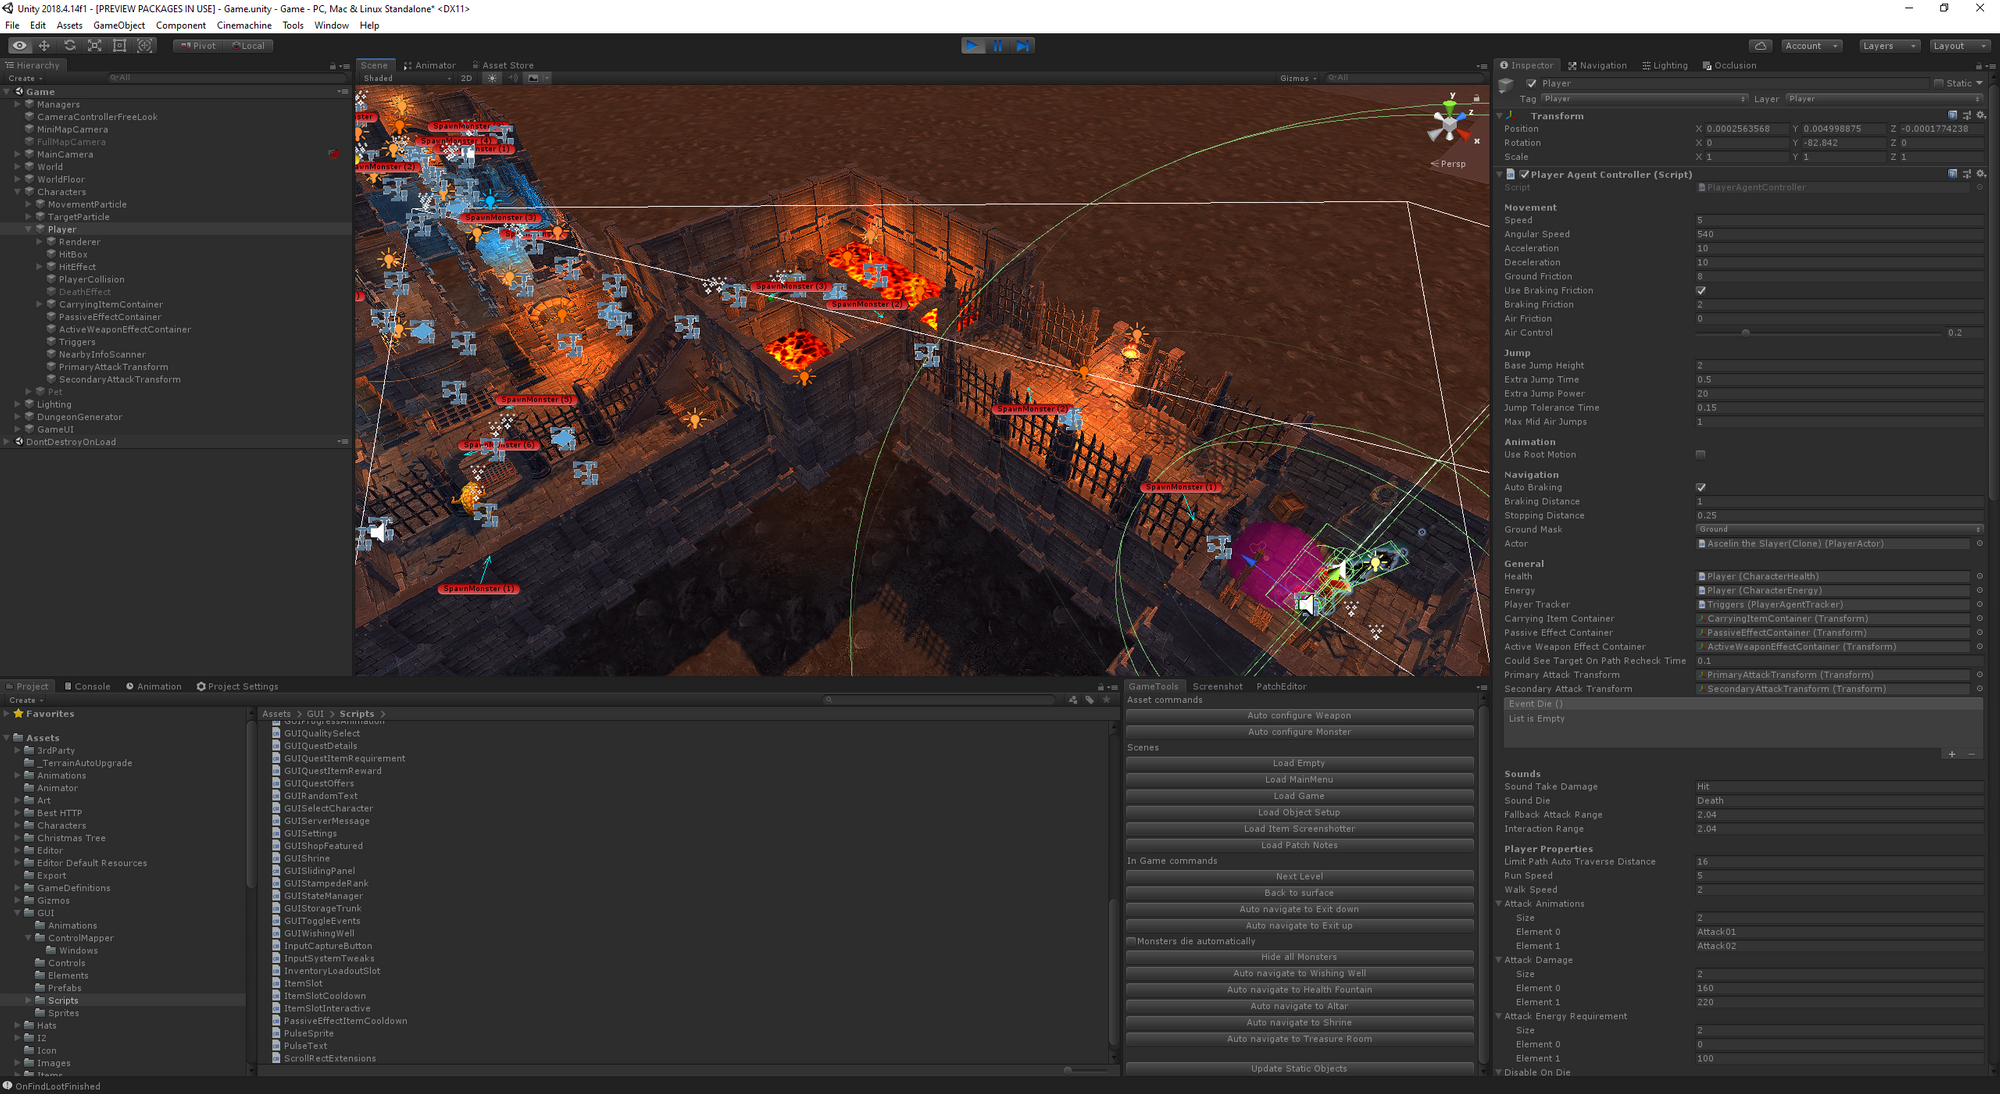
The SDK includes two main components: an editing GUI for managing your projects, and an API for querying and mutating. The GUI makes it very simple to create, edit, mint, and melt your items.

When I first started, this was my saving grace.
It allowed me to visually see what was available and what I could do—without directly querying GraphQL, which I wasn’t yet sure how to use.
I could see and edit my items all in one place.
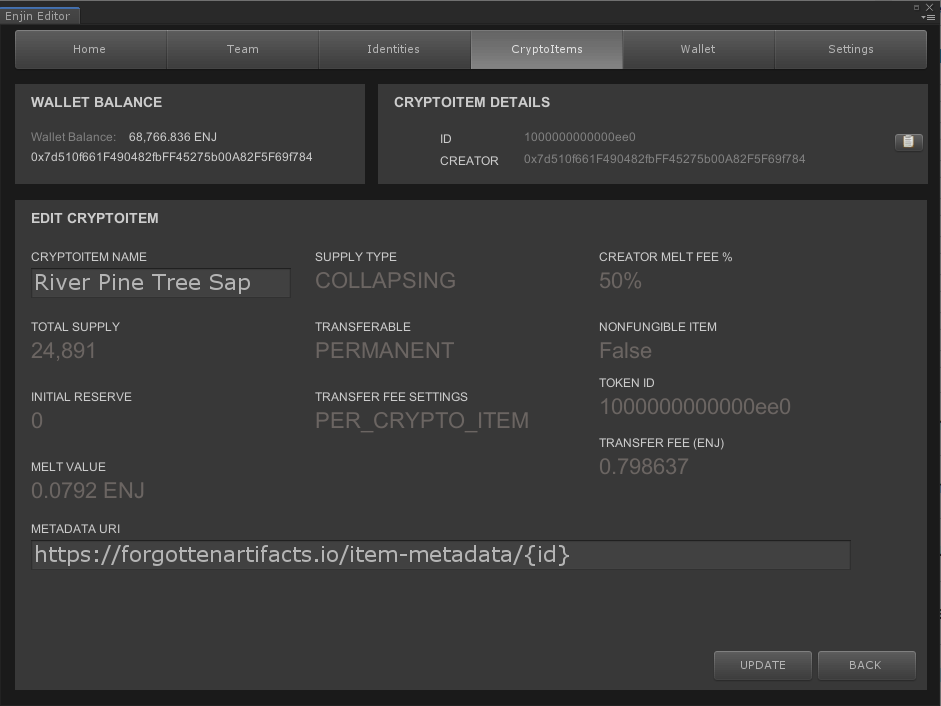
Eventually, you will want to move this process to something automated, though. While it’s a great introduction, it’s not something you should use long term if you’re creating many items.
Recently, Enjin updated their web console to include the above editing tools, so you can do all the same straight from their web panel now too, which is awesome.
The API code is a wrapper around the GraphQL calls, and includes code for connecting to the pusher service for updates (e.g., when a wallet balance is updated).
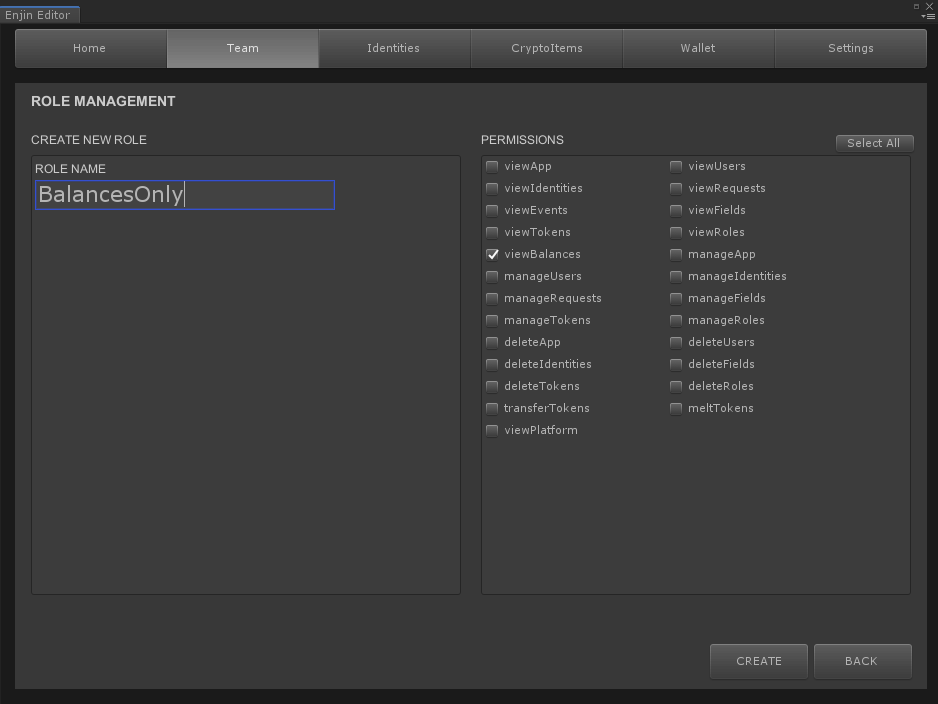
This API should only ever be used with an identity that has had permission limited to views only. Any permissions that give the ability to modify should be removed.
The only view permission you need is viewBalances.
You then enter your login details into the SDK, and it’ll save them for use from your client.
Be aware that these details are stored in plain text in your game binary. If you do this, you give whoever downloads your game full access to that Enjin account, so make sure it’s locked down.
You could encrypt these details in your game binary, but it’s actually much easier than you realize to reverse those details and recover them from your game.
Personally, I’d warn against doing this because you may accidentally add your admin details while developing, forget to remove them, and release full access in a build.
You’re also going to be doing more queries to Enjin because your server still needs to query the same information to validate operations, and the client then needs to query them again. If Enjin implemented quotas for API calls, then you may need to find creative ways later to reduce your client calls.
If everything is on the server instead, you can add caching there and then return a snapshot to the client. If you store that cache on your server and Enjin or Ethereum goes down (which has happened twice in the eight months I’ve been live), your players will still be able to use their items.
I do not recommend using Enjin's Unity SDK (or any other client engine SDK) for anything important such as creating or minting for your game (e.g., if you send an item to a player for completing a level).
You want a server that you fully control to be the authoritative agent, and the only entity that does these operations.
In my case, I have two inventories for a player: virtual (any items that aren’t blockchain-based, or items that are blockchain-based and are sitting in the queue waiting to be sent) and blockchain .
The server queries both, combines them, caches it, and sends the cash to the client. The cache is flushed every now and then, but the client also monitors the pusher channel for changes. The client tells the server about this during the next update; if changed, the server flushes the cache for that user, too.
At it’s core, the Unity SDK calls Enjin’s GraphQL service.
I used Enjin’s Unity SDK as a learning resource. The majority of my early knowledge about how things should be put together came from reading the source code for the SDK.
If you’re waiting for other SDKs such as an Unreal, I recommend to instead just dive in and start by directly calling GraphQL from your server, since that’s what you’re going to eventually need to do anyway.
.jpeg)
Ensure all of your blockchain mutation operations take place only on a secured server.
You never want your client (be that native Windows, Mac, Android, iOS, Web) to be executing GraphQL calls directly because it allows anyone with enough knowledge to do those calls themselves outside of your client/game.
When I launched the Stampede event, I would send items to players as soon as they successfully exited the Dungeon.
This worked fine, and I sent thousands of items out very rapidly—that is, until the Ethereum network got congested.
I discovered that you can have about 16 pending transactions on your account (waiting to be mined) before any of Enjin’s blockchain-related calls would start returning an error. If you didn’t track which items you were attempting to manipulate, you now have no record to fall back on.
Items lost during this time in Lost Relics are understood to have been lost in the lava of the dungeons.
It also costs gas for each transaction, and the amount of gas you pay increases with the amount of data.
Back then, I was sending a single item to a target wallet in a single transaction using a standard send (a lot of ETH just to send out items ?).
Instead, I recommend using Advanced Send for all of your sending purposes. You can send multiple items to multiple addresses all in the one transaction.
There are limits because the size of the transaction itself has a limit, but a rough guide is no more than 100 entries in the transfer array. Note that the count of the items doesn’t matter if you’re sending fungible tokens (FTs), but non-fungible tokens (NFTs) can only be one per entry.
Almost every mutation call to Enjin’s GraphQL returns a transactionId. It is important to store this because you can use it to query the state of what you just did. Don’t just store it in a log—store it with your data so you can use it to query state later.
For example if you issue a send, you can use this transactionId to determine if the send was successful, is pending on the blockchain, or has failed.
A common GraphQL query I use when investigating a transaction is:
query {
EnjinTransactions(
id: TRANSACTION_ID_HERE,
) {
id
transactionId
type
state
error
nonce
token {
id
name
}
retryState
}
}
This query returns enough information in the one call to determine the cause of an error or the state if there was no error. Most of my server processes use this query in order to determine state.
For example, to determine if someone successfully completed a quest, I use this query to determine if the transactionId that I issued to the player for the requirements for a quest were successfully sent to the game wallet.
Advanced Send is awesome. You can use it to send items to multiple people or to request items from them. I used this to implement the quests you see in Lost Relics.
In the example below, I’m sending 20,000 FTs of TOKENID1 and 10,000 FTs of TOKENID2 from myself to two different wallets in one transaction:
mutation advancedSend {
CreateEnjinRequest(identity_id: SENDER_ID, type: ADVANCED_SEND, advanced_send_token_data: {
transfers: [
{from_id: SENDER_ID, to: "0xTARGETWALLETADDRESS1", token_id: "TOKENID1", value: "20000"},
{from_id: SENDER_ID, to: "0xTARGETWALLETADDRESS2", token_id: "TOKENID2", value: "10000"}
]})
{
id
encoded_data
}
}
You can add more items into the transfers array to transfer more at once; just make sure you don’t add more than about 100.
To request items, just use the identity_id of the user you’re requesting from. Note that the identity_id of a user is specific to your platform, and they must have linked their wallet and approved ENJ spend.
When you’re testing on Kovan, transactions occur very quickly. Most of the time this is also true on Mainnet, but sometimes there are issues.
Some common issues I’ve encountered are:
Either design your blockchain interactions so that they’re less in-the-moment or ensure you have a way to manually override processing in the event that the processing time is exceeding what’s acceptable.
You will definitely want to make sure any blockchain interactions can be interrupted and resumed later in the event that gas prices have caused delays.
For example, if you allow your players to craft an item, the crafting process should provide enough information of the progress and allow the player to interrupt the process and resume later if they deem they’ve waited too long.
You can see how this works in Lost Relics by completing a quest or opening a storage trunk.
In addition, design your server logic to allow you to override the state checking of a blockchain transaction. In my admin panel, I provide a button that allows me to force the blockchain state to successful. I’ve used this quite often over the last couple of months when blockchain transactions correctly processed, but weren't being seen by Enjin.
Just make sure you don’t approve transactions that haven’t successfully processed, which you can do by checking the transaction hash on EnjinX.
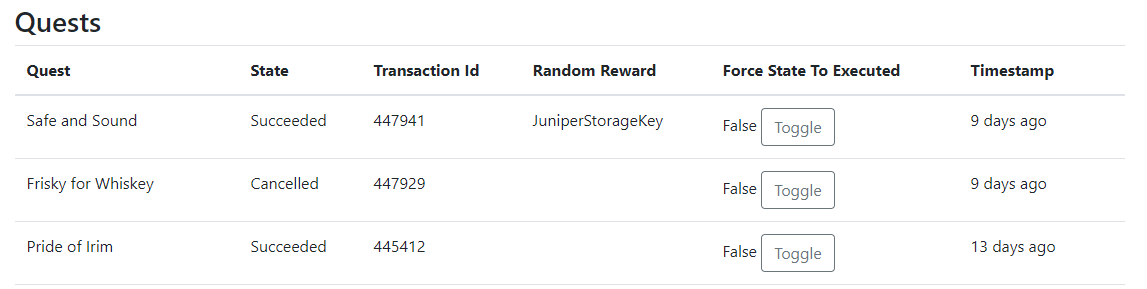
Providing this fallback has allowed me to manually verify the transaction was successful and then push the quest into the "ready to claim reward" state so my players can continue.
I initially released with my backend powered by PlayFab and used the item catalog and drop table features quite extensively. In a traditional game where there are unlimited items, the system works extremely well.
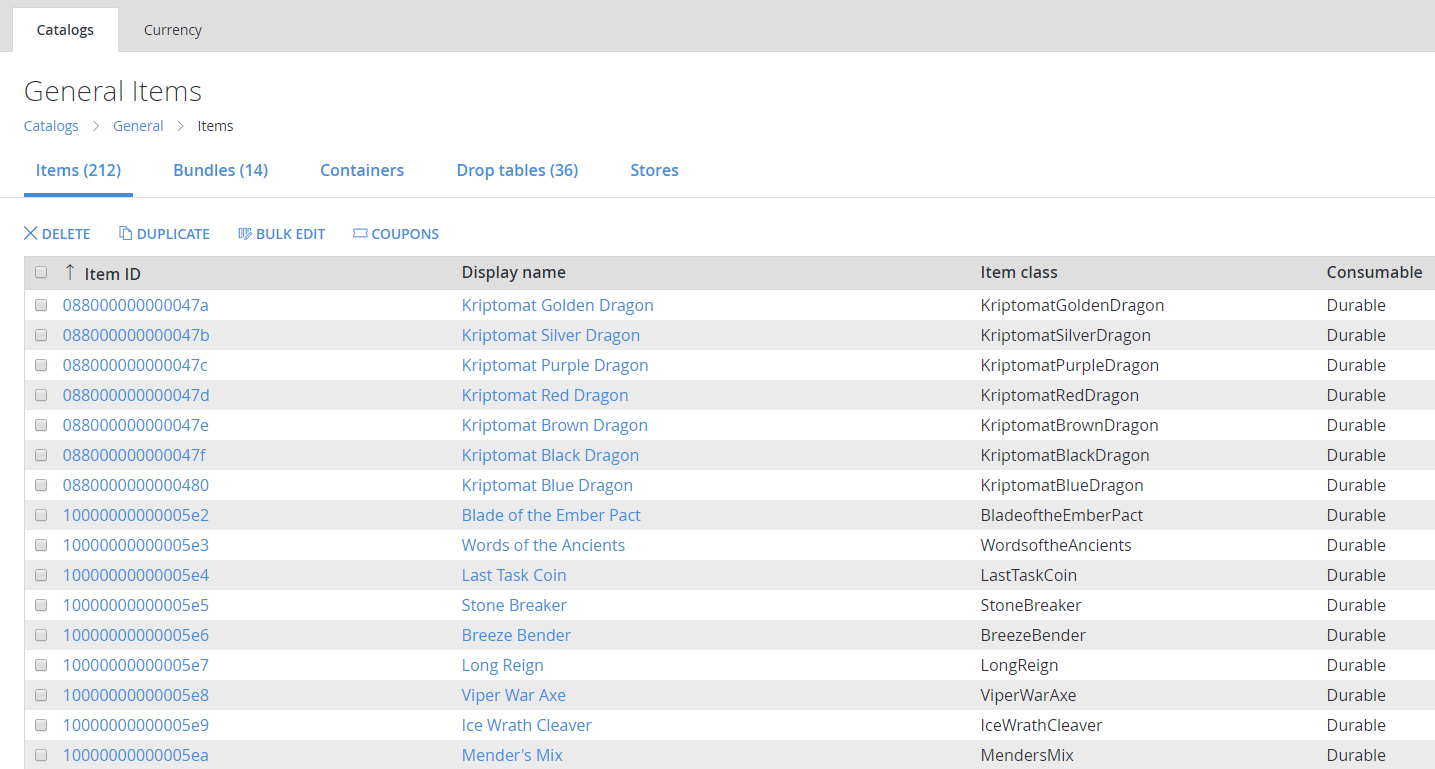
If you’re managing limited supply items, you may run into some of the same issues I did.
As the majority of my items were limited in supply, I needed to accurately ensure I wasn’t giving away more items than I actually had in the wallet. It would be poor form to show a player they’d just won the ultra-rare Godslayer but not be able to send it to them because I’d run out of stock.
PlayFab has a "limited edition" feature which you can enable per item. This appeared to be exactly what I needed to use, however they have an arbitrary limit of 100 total items. I believe this may have been raised to 1,000 now, but that number is still not sufficient if you have any number of items above that value.
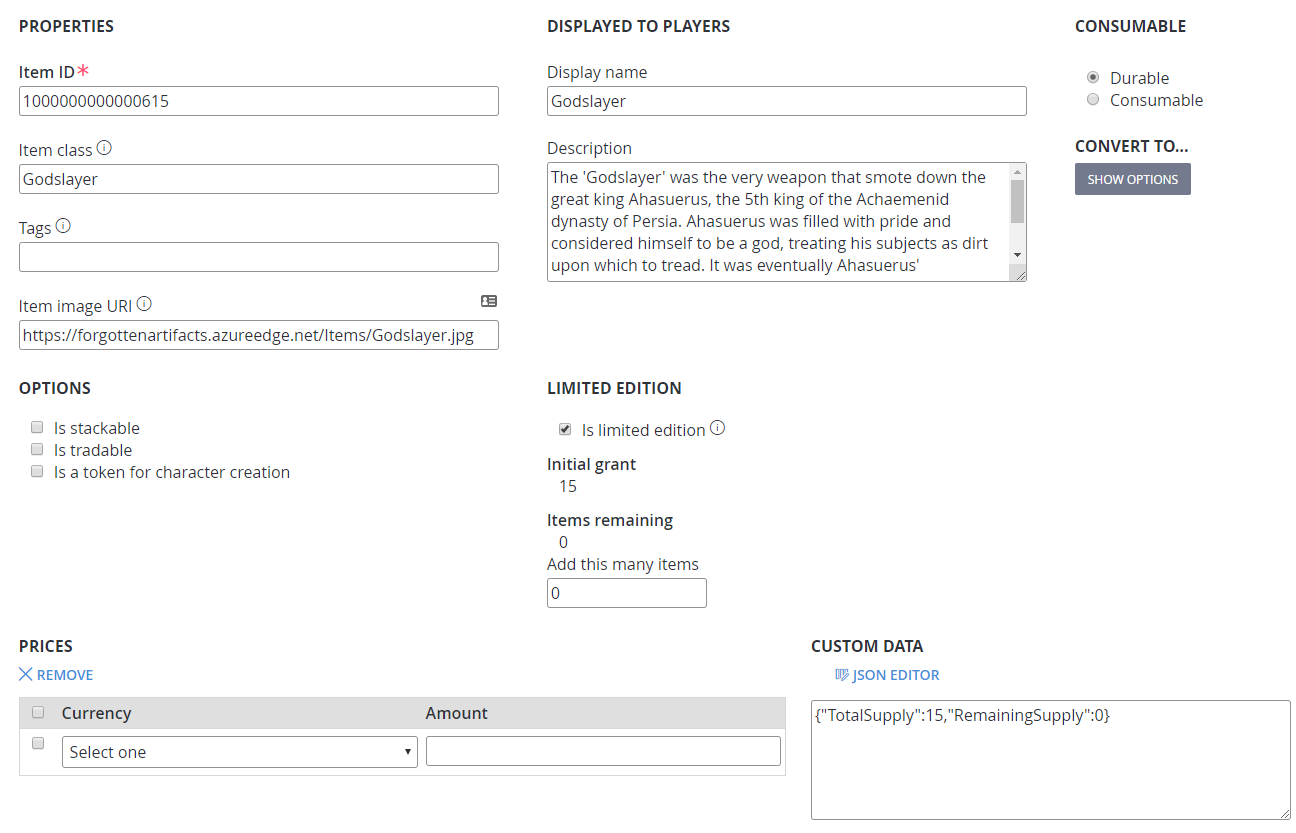
This was the first hurdle I encountered, so I had to come up with a creative solution around it. To do this, I tracked separate custom data with the item. This custom data tracked the total and remaining supply.
Every time I gave an item to a player, I’d check if this value had dropped to 25, and if it had, I’d top it up to 100 (if there was sufficient remaining supply). It was janky, but it worked and allowed me to continue working using their systems.
I personally prefer C#. I started my early coding days in high school, learning QBasic and later Visual Basic, then moved to C and C++ when I started working in the games industry. I picked up a bunch of other languages along the way, including those used for the web (PHP, Javascript, etc.).
PlayFab uses Javascript for its server-side scripting, and while I know how to code in Javascript, I prefer C#. The entire rest of my stack was all C#, from Unity to my custom tools, so this was a downside for me, but something I could live with for the time.
PlayFab has made inroads to allow you to execute C#, and I believe they’re close to releasing this soon (it’s currently in private preview).
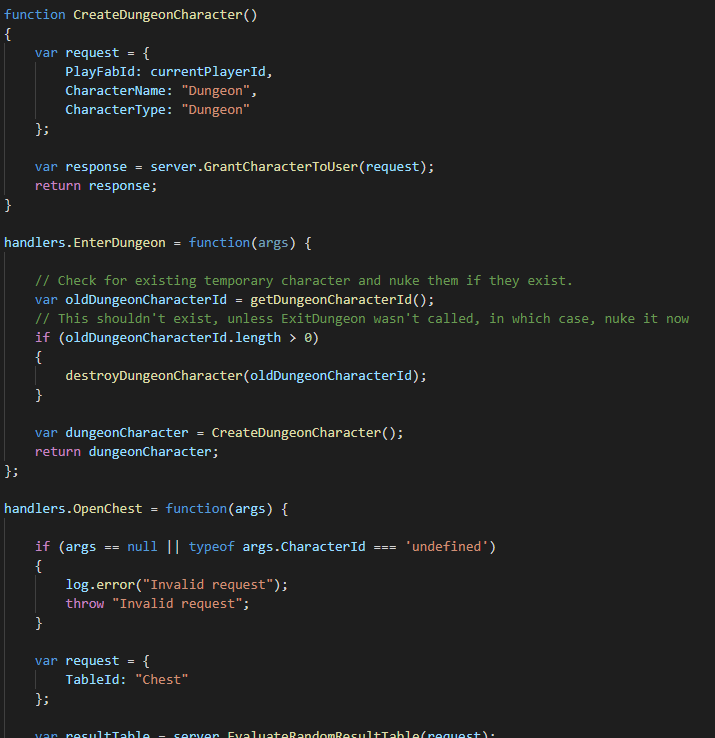
A limitation of PlayFab’s server scripting is that your script can’t take more than 10 seconds to execute. If it does, it’s terminated—in my experience, after about 9.3 seconds.
While the majority of use cases will never come close to this limit, I started hitting it within about a month as I was adding more and more Enjin API calls.
Enjin’s GraphQL calls from PlayFab’s servers would sometimes take up to a second to execute depending on the amount of data I was querying (for example, the amount of items players had in their wallets), or if they did a new release on their server. Mix a couple of Enjin calls with PlayFab calls and it quickly adds up.
If there were any additional networking hiccups, a single Enjin call could take a couple of seconds or longer.

As I added support for more Multiverse items and more calls to Enjin, I discovered that functions written in PlayFab’s server scripting were only partially executing.
I had no idea how much of the function had run and discovered that the only way to increase execution time was to upgrade to the Enterprise tier. I had already upgraded from Free to Indie, then to Pro to get some level of support a few weeks before, and I wasn’t prepared to upgrade to the highest possible tier just for this one feature.
.jpeg)
There was no way around the execution time limit, so I had to find a solution quickly.
I decided to convert all of the server logic and other code from PlayFab server scripts (Javascript) to C# code and run it on Microsoft Azure as a web service instead. This allowed me full control over how long scripts ran and meant I could still use PlayFab’s services from my server.
It took about a week for me to convert all of the code over. I was now running my code on my own Azure web service and relying on PlayFab for all user accounts, items, inventory, leaderboard, etc.
Over the course of my time on the PlayFab platform, I encountered several bugs, including a critical bug that affected the limited supply features I was using. I had no control over each of the issues I encountered and had to wait for PlayFab’s support team to respond.
The Free and Indie tiers offered only forum help, with response time generally taking 24–36 hours. For some of the more critical issues I encountered, I ended up upgrading to Pro because it offered dedicated support. Unfortunately, dedicated support took almost as long as the forums to get a response, and it seemed like they were more eager to close issues than resolve them.
I’d also had a longstanding issue where player accounts no longer loaded once there were over 2,000 item log events on a given account. To fix this, I suggested they could simply add paging support, but the issue was never addressed and PlayFab support deemed it a "future feature request" that needed to be voted on.
As more of my players had items added to and removed from their accounts, more accounts were no longer loading. Along with the support issues, this was the final straw for me.
It was time for a fresh start using my own custom solution.
I’ve written many backend services over the years, so I knew I had the ability to take on this mammoth task of recreating a large majority of PlayFab services.
It was now sometime around mid-August, and I started work on removing the reliance on PlayFab. I recreated various systems one at a time and brought them online once I was happy they were working similar to the PlayFab offerings.
I ended up continuing with Microsoft Azure as I’d had the most experience with it in the last couple of years and they natively supported the C# .Net Core stack I was already using. I created a database powered by Azure Sql and I made use of their CDN, Service Bus, Blob Storage, and Application Insights.
First, I created my own user authentication system, which relied on passwordless email authentication (similar to how "forgot password" mechanics work). Once this system was transparently handling the authentication side, I started work on recreating the item database.

Once the item database was working smoothly, I added player inventory support, player account management, adventure tracking, leaderboards, shop, and an administration backend, among other smaller services.
On September 17, I successfully launched the new backend with a complete refresh of the website as well. After a few minor fixes, it’s been running fantastically ever since, and I continue to build upon and improve it.
Some developers will simply setup direct access to their databases, run SQL queries to read and write data and manage their accounts, and that’s enough. I, however, prefer to reduce the human error component and create interfaces that anyone can use.
I created a simple administration panel to facilitate this and give me a control panel for managing and administrating Lost Relics.
I use the admin panel to create my game items (including blockchain items), set up new events, adventures, and quests, all without the need for executing handmade SQL commands and to ensure particular rules are followed when entering the data.
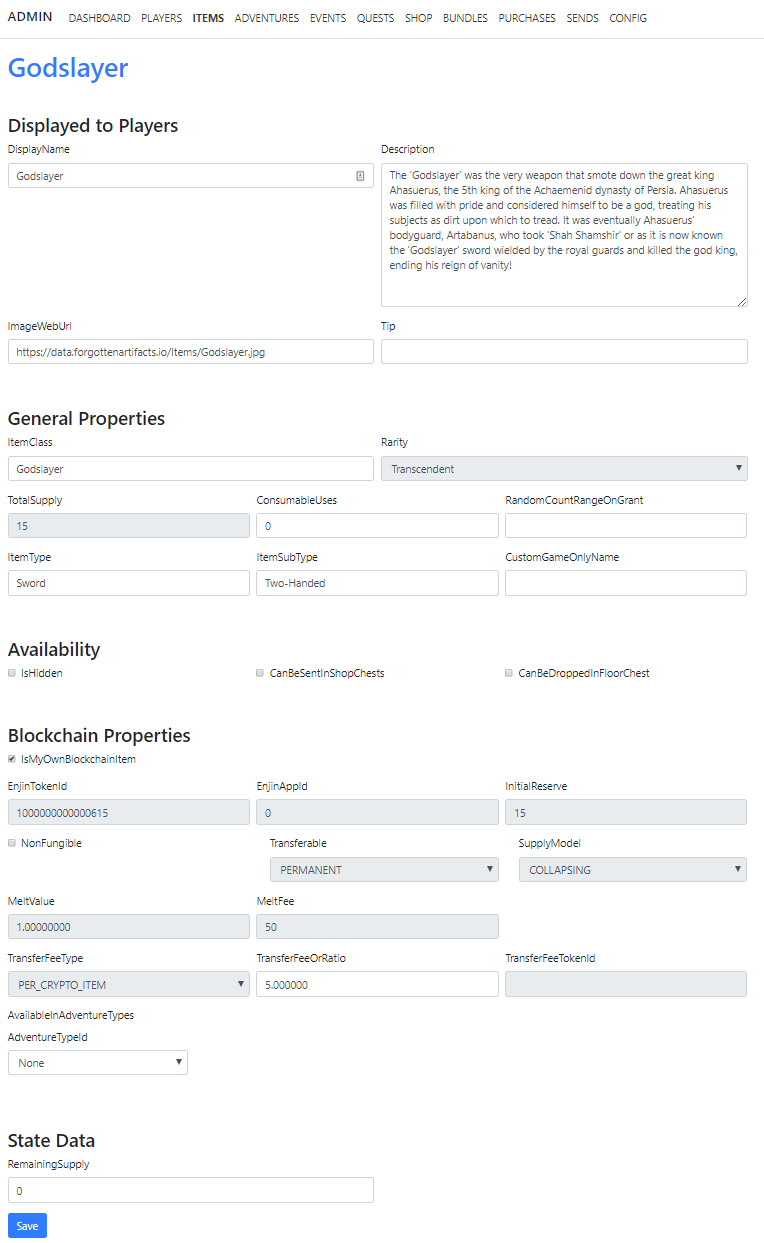
If the system detects that an item is a blockchain item but has not yet been created, I can create it straight from my admin panel.
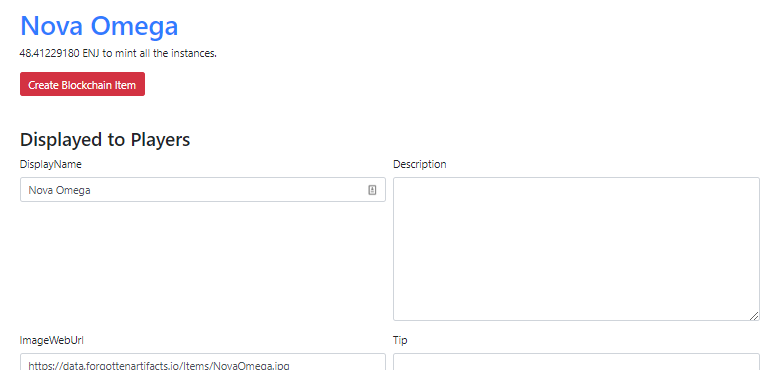
When I click the "Create Blockchain Item" button, the item is added to a queue for processing. It’s picked up by a server Web Job which will issue calls to Enjin to create the token with the entered values, set the metadata, and mint all the instances.
I highly recommend setting up automated systems like this for your own projects as it removes the human error component.
After the Stampede event, I realized I needed a queue to process my transactions at a later time. The benefit of a queue is being able to check for several preconditions before you send your items.
I check for the following before sending items:
If all of the above preconditions are met, then I send a batch of items out.
I store the resulting transactionId and check it regularly to see if it’s successful.
Step 4 is repeated until there are no more full batches left, or after it’s been about 30 minutes with no change in the transaction state.
The entire process is run every couple of minutes as a Web Job on Azure.

When I used to work in the games industry, every company I worked for had their own in-house game engine.
Each engine had their own pros and cons and was usually limited by the knowledge and expertise of the staff at the respective company.
If you changed companies, the majority of the engine knowledge you had was now useless because the engine at the next company was so very different to what you were using before. There were generally no standards enforced across the industry during this time, and each company ventured down their own path.
Unity has changed this and added much-needed competition and finesse—which has also driven down prices of engines like Unreal.
Back then, the companies I worked for never licensed other engines because the licensing costs would consume almost one-third of the game's budget. Now, it's a totally different (more affordable) story.
I’m a programmer by profession, but I also enjoy art, audio, and design.
The ease of use of the Unity engine, coupled with their Asset Store, has allowed me to rapidly create Lost Relics from the ground up—all by myself.
This kind of ease of use and power was unheard of 10 years ago.
I curate a lot of my art assets from the Unity Asset Store and then customize them to fit within the Lost Relics universe. This is a common process for indie developers because it provides such a powerful boost in productivity.
I rely on Unity to bring the world of Lost Relics to life.
If you’ve ever written an engine, you’ll know just how much Unity handles for you (hint: it’s a lot). I design the levels, create code for the gameplay, and preview it all within the Unity Editor.
Unity does a lot of the heavy lifting so that I don’t have to—instead, I can concentrate on the game and creating engaging and fun experiences for everyone to play.
If you've made it this far, thank you for reading.
If you're a developer embarking on a similar journey, welcome to the movement!
If you're a Lost Relics player, thank you for being a part of this journey.


.jpg)
.svg)
.svg)
